In this Newsletter
- Why Set Up Your Data Story Project?
- How to Set Up Your Data Story Project?
- Ways to Keep it Lean
Why Set Up Your Data Story Project?
Regardless of whether you're a solo journalist/content creator or distributed team, an important first step is setting up your data story project. With some upfront planning and set-up, you can save yourself time, energy and money and set yourself up well for project management, governance and/or compliance requirements.
Before discussing how and what tools to use, let's explore why it makes sense to properly set up and structure your project.
Organization and Accessibility
The more you have a trusted system and process in place, the more time you can spend on higher-value work. For example, a standard process and set of tools provides a structured way to store, access, and manage documents, data and code. It also makes it easier for all project members to find and use the resources they need, regardless of their physical location, and communicate with one another.
Version Control
Tracking versions – be it data, documents, code, or other – is important when creating data stories. Data stories often involve the creation and revision of multiple datasets, scripts, and documents. You can do this manually, but it becomes more time-consuming and error-prone the bigger the project and the more files you are creating. If you get into the habit of managing version control across all of your artefacts, then, again, you can focus on iterating against the latest version of your work.
Document Collaboration
For team-based projects, multiple people might need to access a single document. Thus, document collaboration is another important area to consider when setting up your project. Collaborative tools enable multiple people to work on documents or code simultaneously. You have many options, such as SharePoint, Google Drive or OneDrive, but think about a tool that supports real-time editing and comments, as this fosters a more collaborative environment and speeds up the review and editing process.
Security and Permissions
Data stories may involve sensitive information that require careful handling. Be sure to secure and encrypt your communication, documents and project artefacts as needed. Also, document the security protocols and policies – for example, specific protocols, assigning and managing permissions, levels of encryption protocol, and so on.
Scalability and Integration
As projects grow, the amount of data and number of files increase. Scaling can sometimes be an afterthought in the beginning, so keep the process simple, documented and easy-to-manage when you're first starting out. And as you get more experienced, think about ways to automate and focus on reusability. This will free up time, increase focus on the finished product, prevent bottlenecks and maintain efficiency as project demands escalate.
Backup and Recovery
Back in the day this was making sure you didn't just have a local copy of your document on your laptop in case Windows crashed and took your work with it. Now, storing and working with or in the Cloud is the default, so you can create a project structure that allows you to work locally with a back-up in the Cloud – or work directly in a Cloud environment. Further, the range of features Cloud-based platforms is getting better with newer tools and AI automation. Document and code management tools automatically back up your data, which protects against data loss due to hardware failures, software issues, or human error. This is critical for maintaining the integrity of your project's data throughout its lifecycle.
Audit Trails and Compliance
If you're a solo journalist or content creator, this may not be high on your list. However, plan for growth and build the ability to audit your project artefacts. This will, in the least, give you a place where you can more deeply validate the data, analyses, results, models, and so on. At best, as you grow into more complex or sensitive topics, you have the ability to audit all facets of the project for transparency and accountability.
Professionalism and Reliability
We'll state the obvious here, but be professional and reliable. Whether you're designing a visualization to tell a story around climate change or working on the next Panama Papers, the end result matters – as do each of the steps along the way to get there. All of the example considerations listed above will help you design and implement a process for managing your data story projects that works for you and allows you to create an amazing finished product for your customers or audience.
Let's talk now about the specifics of how to set up your data story project.
How to Set Up your Data Story Project
It can be daunting when you first set out to create a data story. What to do first? Where do you spend your time? Where can you automate? How do you keep costs in check? The questions seem endless. And the bigger the project, the more questions you'll have.
To help guide you in setting up your data story project, we created the below diagram from the projects we have worked on. Each circle in the diagram represents one part of the project – be it an activity, tool or platform – that serve a purpose. For example, Team Communications calls out the fact that your team needs to keep in contact throughout the project, and you can choose different ways to do it. However, you should select a specific channel and stick with it throughout the project, so your team has a predictable and consistent way to communicate with one another, send status and updates, ask questions, and so on.

You'll also notice that each arrow that connects the circles has an action or activity tied to it. For example, Add Files means you may have a deliverable from one part of the project process that you'll want to upload and save alongside other project files. These files could be UX journey maps, code, story conceptualization docs, draft articles, and so on. Build represents the code that you may need to write, build and release, which you'd manage locally and within a Cloud-based code repository. And Notification means that there should be some communication out to the team of the progress on that specific part of the project. For example, when you've completed and added a UX Journey file to your Code Repository or Document Collaboration tool, then there should be communication (preferably automated) out to the team that this is done and available for use.
Let's walk through each one of the parts of the project set-up.
Team Communications
This should be the first item you address with your project. If it's just you, then it's picking an email (or other channel) to use. However, if you have a team, then you'll want email and a more real-time tool like Slack or Teams. A good practice here is to pick the communication tool(s) and draft a short document or email with guidelines for use for those tools and create a distribution list (DL) that includes all of the project members (and their contact info), access to the tools, short FAQ on use, and so on.

Document Collaboration
Also known as document management, it's important to keep your documents available and version-controlled. Most of you likely work both locally and in a Cloud-based or Software as a Service (SAAS) environment, but wherever possible be sure to select a tool where you can easily upload and share documents. Ideally, you have something with version control (or you create manual versions and have a protocol that the team understands – e.g. filename_v1.doc, filename_v2.doc, etc.). OneDrive and Google Drive are lower-cost options whereas SharePoint with O365 have lots of features and cost a bit more.
Code Repository
We always create a code repo for a project. We mostly use private GitHub repos – unless we're working on an open-source project. This allows you to create a folder hierarchy specific to your project, share out the repo to the team, keep the repo secure, assign people specific folders (or aspects of the project that map to folders in the repo), and co-mingle all types of files – e.g., data, code, documents, HTML files, images, and so on. You also get version control, file/code storage, ability to pull and merge files, projects (for Kanban type project management), milestones, third-party integrations, workflow management, security, and more.
Content Platform
Your content platform may differ, depending on if you're writing an article, creating a video, designing an infographic, and so on. Each platform comes with its own content publish process, rules and restrictions. The goal for you should be to design a way to have built, reviewed and ready-to-release data stories (i.e., your content with your visualizations and models integrated into it) in a code repository. The jump from the code repo could be manual or some tools have native support for workflows that can integrate with GitHub or other dev ops tools.
Research Tools
Your research tools will vary and are often distinct from the aforementioned platforms or tools. That is, you're likely using Google, Google Scholar, Open Gov sites, ProQuest, JSTOR, first-party tools, and so on. You may be storing bookmarks or downloading documents to read later or share with the project team. You also may be taking notes while researching. It is the links, notes and downloaded documents that you want to make sure you upload into your document collaboration/management tool.
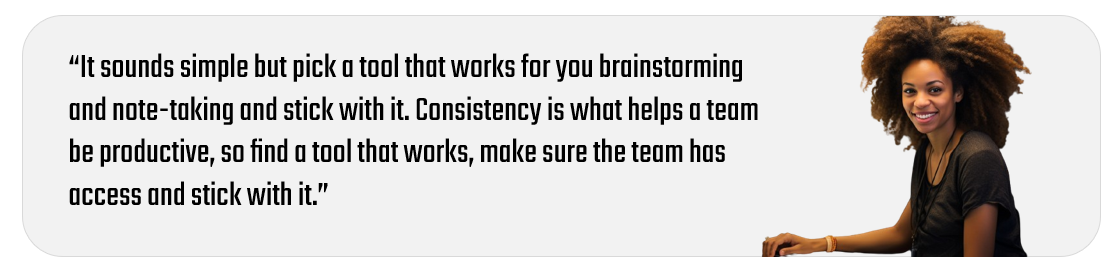
We use OneNote as our note-taking tool and share PDFs, data files, and the like from research through document management (OneDrive, GitHub and O365). Other tools, such as Notion, Evernote, and Trello are also good. The key is to keep as much as you can in the Cloud, secure and accessible (read/write) by the project team.
Notetaking & Brainstorming
We mentioned this above, but notetaking and brainstorming are an important part of the data story project. Spending more time on getting your thoughts down, bringing in research and expertise into the brainstorming, and continually distilling the notes into a cohesive story is valuable – this is the process that helps shape the story. The process itself is messy, may feel like it involves lots of discussion but this is what gets you to a great end product.
Again, tools like Notion, Miro, OneNote, and other SAAS-based tools are great for both creating that central digital whiteboard where you can both brainstorm, share ideas and shape the data story.
UX Journeys
If you're conceptualizing your data story through a video or even a comic, you'll want to sketch out the flow and arc of the story. Storyboarding is something we do regularly, regardless of whether the data story is a short business presentation or a larger video that carries a political message. Sketching out the journey can save you lots of time later on, so again spend the time sketching and shaping before you get into producing the content.
We use tools like Figma, Miro and Balsamiq to create wireframes and UX mock-ups. We'd recommend something that has the ease of use and can export your work into images or PDFs (so you can get these to the project team in your code repo or document collaboration/management environment).
Hopefully, the above gives you a good starting point of how you can set up your project. Of course, your project may be simpler and not need all of these tools, or it may be more complex and longer-living, requiring someone to project manage all of the pieces. Either way, the above should get you started!
The final section will offer some suggestions around how to "keep it lean". It applies more to the solo journalist/content creator and small independent teams.
Keeping it Lean
When we first started building data stories, we found ourselves repeating certain activities and doing things in a more manual way. This created pockets of inefficiency, which took us away from spending time on the creative aspects of the data story. This forced us to think about where we could optimize – i.e., automate wherever possible, document process and workflow, leverage lower-cost tools, and focus more on the product rather than the process.
With that in mind, we've listed out four actions we took to improve the process and flow of a data story project.
- Create a project document that outlines the project goals, team members, tools, and so on.
- Create a consistent folder hierarchy for your data story project(s).
- Create a private repo for all project artefacts.
- Automate your data ingestion, cleaning and transformation.
Beyond the above – and especially if you're working in a team environment, we'd recommend having a kick-off meeting to review the project, answer questions and set milestones. If you're running solo, then light project management is appropriate, such as a target milestones and a roadmap.
Let's talk through each one of these.
Create a Project Overview Document
Writing a few things out at the beginning of a project will get ideas and thoughts out of your head and written down. This is a good document to have before you get started with your Research phase. For a team, we'd recommend more of a formal document that can be shared and reviewed. For a solo operator, a document, journal entry or brainstorming notes would suffice. The goal here is to get some initial structure of the data story project written down.
When creating the document, an ideal outline might be the following:
- Description – a single paragraph should suffice
- Goal(s) – try and keep to a reasonable number (e.g., 2-3) so they can be achieved
- Target audience – include demographics such as age, education, profession(s), geographical locations, etc.
- Target platform(s) – the platform, channel or medium on which you want to publish the data story
- Outcomes of the data story – what you want the story to accomplish, an action the audience will take
- Deliverables – represents the different pieces of content to be created and published
- Milestones – high-level milestones with dates (and owners if required)
- Tools – which tools you will use for specific parts of the project and the process to get access/permissions (if required)
- Metrics – what KPIs are you using to measure the progress and success of the data story project
You may think of more, but the above typically give you a good starting point along with the ability to assess whether you can reasonably deliver against your milestones.
Create a Folder Hierarchy
The process of creating an overview document should give some shape to the project, so the next step is to get a folder hierarchy created. The folder hierarchy will house the different parts of your project – for example, storyboards, data, analyses, and so on. For our projects, we use a folder structure similar to the below.
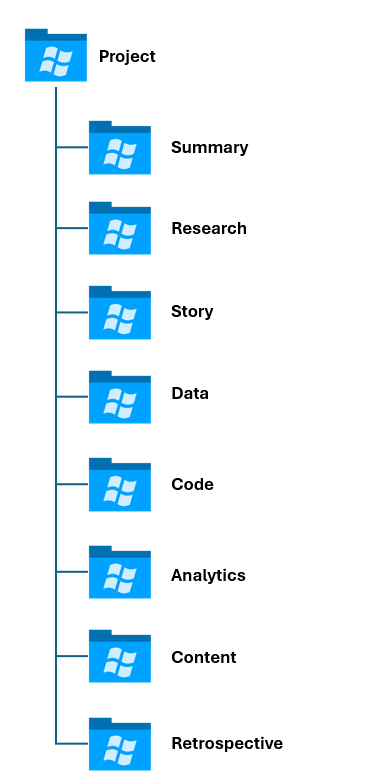
Each folder may have different types of artefacts, each with a different owner. For example, the Research folder will have a spreadsheet or doc with links in it, interesting research papers we want to share, and any notes we might make during this phase of the project. The Data folder would have raw and original datasets, cleaned and transformed datasets, data that has features in it that can be modeled for predictive forecasts, and so on.
After you've completed this process, you can move onto synchronizing these local folders with a document management/collaboration environment or a code repository.
If you're not a programmer, but want to create a reusable folder structure, the below script template is a simple way to create a directory structure with the above outer folders and various subfolders.
mkdir "Project_Name\Project\Overview"
mkdir "Project_Name\Project\Team"
mkdir "Project_Name\Project\Tools"
mkdir "Project_Name\Project\Schedule"
mkdir "Project_Name\Research\Papers"
mkdir "Project_Name\Research\Links"
mkdir "Project_Name\Research\Notes"
mkdir "Project_Name\Story\Overview"
mkdir "Project_Name\Story\Storyboard"
mkdir "Project_Name\Data\Original"
mkdir "Project_Name\Data\Transformed"
mkdir "Project_Name\Data\Model_Ready"
mkdir "Project_Name\Code\Web_Scrape"
mkdir "Project_Name\Code\Data_Transformed"
mkdir "Project_Name\Code\Data_Analysis"
mkdir "Project_Name\Code\Web_Code"
mkdir "Project_Name\Code\Feature_Engineering"
mkdir "Project_Name\Code\Predictive_Models"
mkdir "Project_Name\Analytics\Visualizations"
mkdir "Project_Name\Analytics\Reports"
mkdir "Project_Name\Analytics\Dashboards"
mkdir "Project_Name\Analytics\Metrics"
mkdir "Project_Name\Content\Draft"
mkdir "Project_Name\Content\In_Review"
mkdir "Project_Name\Content\Final"
mkdir "Project_Name\Content\Retro"
mkdir "Project_Name\Content\Summary"
To create a similar file for yourself:
- Open Notepad and copy and paste the above code into it and save the file with as a CMD file (e.g., make_directories.cmd). Be sure to edit the folders/subfolders to your needs.
- Save the file into the root of where you want to run the script, e.g.: c:/Data_Projects/make_directories.cmd.
- Open the Command Prompt in Windows and navigate to the folder where you saved the above CMD file.
- Type the name of the file and hit enter.
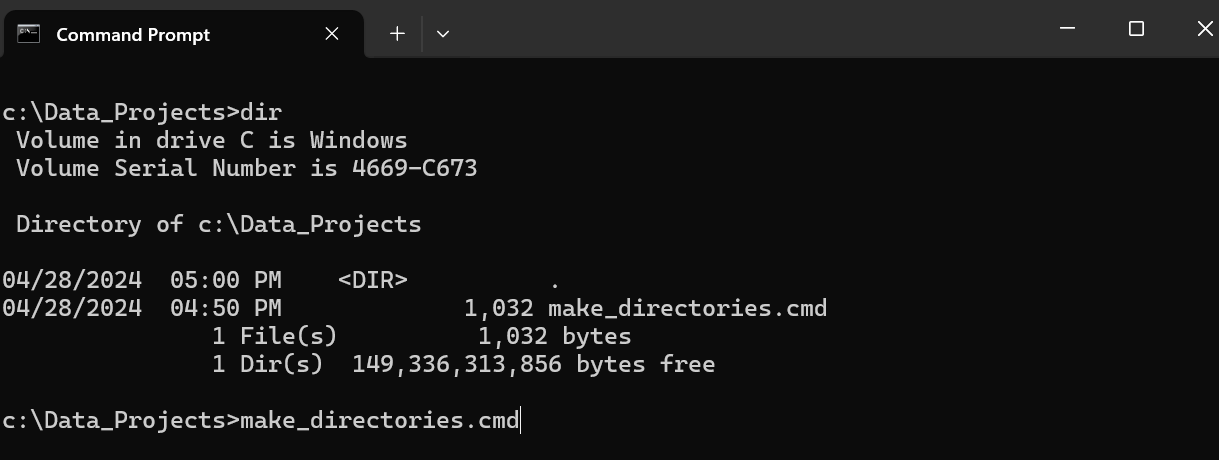
Your folder structure will be created in that directory.
Create a Private Repo
As we mentioned earlier, we create a private repo for our projects. This is because we want a shared environment for the team to use that has version control on the project artefacts. This also enables us to back up and store our project artefacts in a central, Cloud-based way. And lastly, if you need to deliver all of the project artefacts to a customer – as a final set of deliverables or for review, a code repo is an easy way to do this.
We use GitHub as our code repository, which has a range of management tools available for you to use. If you've never used GitHub (or source code) before, you may want to spend some time learning about the fundamentals of GitHub and how you can use the commands. After you have your folder hierarchy set up on your local folder, you can create a new private repo in GitHub and then synchronize it with your local folders. With a few commands (or the use of GitHub Desktop), anytime you complete your work for the day, you can synchronize (i.e., commit and push) your work to your Cloud-based GitHub repository.
Automate Your Data Ingestion, Cleaning & Transformation
This one is a bit tougher because you may need to customize the data ingestion template for each data story project, and no one project is like the next when it comes to data. However, after you've created templates for two to three projects, you'll begin to see the repeatable parts of the ingestion, cleaning and transformation process – enough such that you can create a template that you can then customize for each subsequent data story project.
A couple of considerations here are as follows:
- If the source data is being updated regularly, having a "data pipeline" built and automated for the ingestion, cleaning and transformation is important. You might see this for projects that are financial or market-oriented, where you need to have a pipeline for daily or weekly stock data or financial data. Automate as much as possible so you can focus on getting to a point of analytical consistency.
- If you're doing an historical analysis, then the data is likely not going to change. So, you may not need a lot of automation. The focus here would be more on the data discovery and analysis.
We recommend thinking about scale and future re-use with every data story project you undertake. This translates into creating a data ingestion, cleaning and transformation template that with a few customizations for each project gets you to your analysis more quickly.
Summary
In this newsletter, we introduced you to the considerations and process around setting up your data story project. For smaller projects, you likely need fewer of these steps, and for larger projects, you will likely flex beyond them. However, we have found we have a similar set of ingredients across the projects – irrespective of project size.
We also walked through four "make it lean" recommendations that any project should have – especially if you're a solo journalist/content creator or a part of a small team. Be sure to automate as much as you can so you can get more time to focus on higher-value work. For example, automate the administrative overhead of creating folders, create data ingestion and transformation templates, and where needed create machine learning templates to analyze and model your data. The more projects you do, the more intellectual property, templates and tribal knowledge you'll gather – and all of these are precious time savers as you do more, and bigger, projects.